Now you can Subscribe using RSS

Submit your Email
Showing posts with label DIY. Show all posts

June 08, 2017

DIY Coffee Table

ಸೌP


I am into three-month self-challenge of house revamping. In this process, I have sold out my old cane sofa set and bought a new leatherette three seaters. OLX! yes, within a day old sofa set and a cane book rack sold out!! I am happy that I made a tough decision of selling existence set to buy the new ones. Now, I have the sofa, not a coffee table. So, the search begin.

I was not happy with whatever available online, price wise. I am having a tight budget. As I was going through youtube and Instagram seeking inspiration, this idea stuck me! Why not convert existing teak jali side table to a center coffee table!! For this, all I need is a glass top and some drilling and screwing.

I went out and bought a glass top of 14-inch diameter. I wanted to have a bigger glass top, skipped this thinking of our toddler. Felt not so safe to have a bigger glass top. In between polished the wood and now it's ready to go!


Existing teak table had a foldable base. I screwed and attached to the wooden top. The wooden top has beautiful brass inlay work. I removed center small design and made a drill and screw glass top.

And here is what the end product look like. I do not own cutting plier. Used kitchen pakkad to tighten the bolt. The result, revolving glass!! Cool, isn't it?


May 22, 2017

DIY Lamp Shade

ಸೌP


Now a days I am pretty much hooked into Instagram. There are so many inspirational decor images. One such image made me do this lamp. In that image they have kept a floor lamp which back lighted the palm plant and same was lighting above wall painting. In my case, I have just nailed a beautiful Jharoka which we bought from our recent trip to Jaipur and have a palm plant just below it. Thought why not use an old lamp shade base to do my type of floor lamp. 

I grabbed a piece of cloth, scissors, glue, gum tape and card sheet to do so. I measured old lamp shade base and cut the card sheet. I rolled paper to form a cylinder shape and glued it. I rolled same paper cylinder on cloth to get the measurement, cut and glued on this paper from outside. Looked fab to me. There was a little problem. I needed some base for the lamp. Thought of using beads. To gum the beads directly to thin shade is not possible. Suddenly a new idea struck me. I took out tooth picks, inserted beads in them and stick three of them to the bottom of the shade. DONE! 

Now I placed the bulb and the wiring into its place. My bead base allowed me to pass the wire out from the lamp shade. You can read how I fitted this wiring from this old tutorial.


 Here is the result. I am quiet Happy. How you feel?


With Jharoka, I'll write a new post :)

September 28, 2015

Photo shoot 2

ಸೌP
This is another post related to taking product photos for my e shop. In the first post explained how I created low-cost light box. You can check the same HERE. I used same light setup to take most of the featured products. But when I was introducing fashion clothing, this set up was of no use. Because its small. The light box which I made was only good for jewelry and metal artifacts. At first I thought to ask my friends to model wearing the cloths. This idea was not possible as I have only single piece in each design. I believe it's not good to sell the product once wore by another person. So, after some brain storming thought to click with natural light. Here is the result of first trial at my balcony.

Still I was not sure. I googled to find out more ways to click cloths. Many people are using white board and pin the cloths on it, light properly n take the shoot. For me, I have no studio setup. My space and budget do not allow me to spend on these items. If I go outdoor, there are chances of getting the cloths stained. After much of thinking a way out, I got this idea, why not use white cloth as background and use wooden frame to take the pictures. So decided to go with this idea. Here you can see the setup.

To make the frame stand was challenging. I used weight filled shoe box on one side and tied white string on another side. Later covered the box with dress material and photoshoped the string. Here is the result.

Later edited with designer pattern sketches and the product images looks like this. I have not brighten the images. I wanted to show the actual colors as much possible.


I am sharing this as it might helpful to those  who want to start a e business with low budgets like me. You can check other dress materials photos HERE.

November 29, 2014

Making of low cost Light box

ಸೌP
When I started my e-shop, my major concern was about product shoot. I am not an expert and I can not afford professional photographer at the start up stage. So, I went ahead with natural lighting for product images.  My hubby took starting series of product images. I designed the composition and he took it. As he is a free man and has own ideas of taking photos and I wanted to take photos in my own way. There for this collaboration did not work.  With that he become too busy with his own work.

Then, there left no choice. For second series of brass diyas, I managed to took photos in natural light. I was not happy by the result. Still went ahead as there was urgency for me to introduce brass diyas before Diwali. And that's the few rare moment I hold his camera. I normally use his old camera to take photos. I do not touch his DSLR. Now, Its is the time to learn few tips and tricks.

When I checked other sites, few used natural lighting and some studio lighting. For me, its little difficult to go out and take photos. As I have to carry all products and need to maintain them away from dust and scratches. More over there is no direct sunlight hits inside my house. So, choice was clear, to go for studio setting.

I goggled and find out few good product photo shoot tutorials, also went through video tutorials. After studying a bit, created this light box set up which worked out for me. All tutorials suggested main few things, ie a polished surface, continuous backdrop, diffuser and Photoshop. I went to hardware shop and bought two tiles, black and white and butter paper.  Already I had thermocol at home purchased for packaging. Now, with all these, I created this box.


I hope this image explains you better. Simple formula, have two light source from opposite sides. Use diffuser to create an ambient light feeling. As I wanted lights to be movable, attached them to two old diaries using brown tape. Have a semi reflecting tile as surface, a backdrop. Used low aperture (8.5 to 10)and low shutter speed (1/10 to 1/20). Used remote sensor click and 35mm fixed lens. After taking images, post processed them. I have adjusted white balance in Light room and levels in Photo shop. For taking displayed jewelery image, I have tried 6th times. Trying with different light positions and placing another diffuser from top. Do not forget to switch off other light sources.

Now I have fixed this set up in a corner in our 'workshop' room. I got good result by replacing tiles with textured and white card sheet. You can check other product images from my site. I do not say these are the finest product photos. But, these are good enough at the start up point and to impress buyers.

If you have any tips and tricks, please share with me. Its always wonderful to share knowledge.

November 12, 2014

Paper Truck for my shelf

ಸೌP
I was so happy to see this post and to connect to their shop, Sky Goodies. Somewhere I saw these tiny colorful trucks and always want to have one of those. As soon as I got the link from Art n Light,  next thing for me was  ADD 2 CART. And Yesterday, the much waited parcel arrived. I was so exited and happy. I had ordered this truck and another auto. I wanted to create these with my hubby. As he was late from the office, I did it for myself. I enjoyed detaching, folding and gumming. Front face area was little tricky, still enjoyable. Final product depends on how well you are at gluing. And mini vibrant Indian truck is ready to shine in my shelf.

I have kept  Bombay Auto for my hubby. Its fun to create these miniature beauties with our loved ones. I am waiting for his free time to do it him. If you like these type of stuff check their e shop. What an Idea Sirji!! Yes, its for people aged between 6-106 years ;)

May 22, 2014

Necklaces Organiser

ಸೌP
After so many days, I have made my mind to post here. 

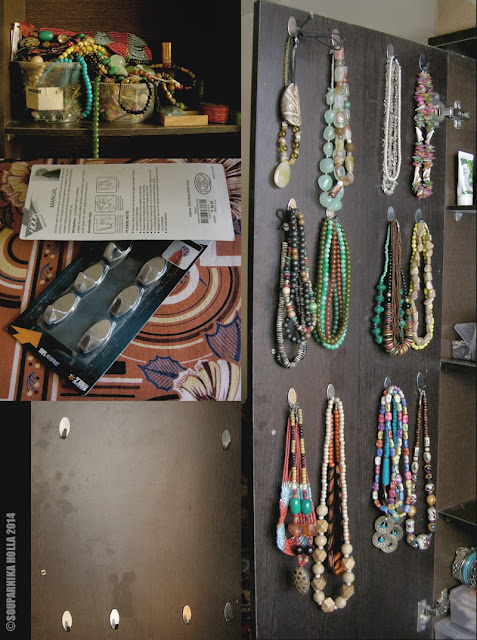
Few days back, I did this necklaces arranger. Previously, I used to keep them in a transparent plastic boxes. While each morning in a hurry to catch the office bus,  picking them out of the boxes used to create a mess. So for fixing this, I was looking for some ideas. When I was shopping at D Mart, this hooks set cached my eye. I bought two sets, fixed them on the mirror cabinet door and it worked! Here is neatly arranged my so called collections.

jewelry-organiser


November 30, 2013

Another DVD Collage

ಸೌP
I was checking my DVD collections and which reminds me of my old post . So, I  tried to do another collage.

Whenever we feel like, both of us buy film DVDs . This collection started from Bangalore. At that time, we used to buy pirated DVDs from Jayanagar 4th block. Those comes around 100 buks for four movies. You can see those collections on left top portion of the below image. Later on, we decided to buy originals and started to collect whenever there is offers!  Most of them bought at Crossword and some from Reliance Timeout.


Movies Include; my favorite James bond series ;Golden Eye, Tomorrow never Dies, The World is not Enough, Die Another Day, Thunderball, Dr NO, One Her Majesty's Secret Service, Design to Kill, A View To Kill, You Only Live Twice, From Russia With Love, The Spy Who Love Me, Gold Finger, Octopussy, The Living Daylights; After The Sunset, Ocean 11, Ocean 12, Kungh Fu Castle, Shaolin Soccer, The Day After Tomorrow, Independence Day, Mind hunters, Batman, Batman Returns, Batman Forever, Batman and Robin, Jungle Book 1 n 2, The Fox and the Hound, 101 Dalmatians, Dumbo,Pocahontas, Mulan 1 n 2, Spirit, Bambi, Anastasia, Beauty and the Beast 1 n 2, Aladdin, Aladdin and King of Thieves, Hercules, Hercules Zero to Hero, Endless Waltz, Appleseed, Lady Death, Arjun,  Barnyard, A Bug's Life, Antz, Jimmy Neutron, Dinosaur, Chicken Run, Toy story 1,2 n3,  Shreck 1n2, Finding Nemo, How to Train Your Dragon, Madagascar, Dragon Blade, Robots, The Incredibles, Shark Tales,Car 1, Bolt, Monster vs Aliens, Tangled, The Mummy 1 n 2, The Scorpion King, The Fast and Furious Tokyo Drift, The Transporter 1 n 2, Rush hour 2,  Hostage, Last Man Standing, The Metador, Cellular, 10,00 BC,The Golden Compass, Transformers 1 n 2, Alien vs Predators, Pirates of Caribbeans, Troy, The Warrior, Nomad, Kundun, Alexander, Deer Hunter, Dejavu, Namesake, Million Dollar Baby, The Passion,Crash, Babel, Blood Diamond n more to come in future.

December 30, 2012

A VCD Collage

ಸೌP
Wow! after a long gap I am posting a new blog!  Reason? My PC. It was down from few months. Yesterday, motherboard declared dead and replaced with new one. With that additional new hard disk, RAM, LED monitor & so on.

This is the collage I created two days back. I was cleaning my VCD box n this idea stuck me. Cool na?

July 15, 2012

DIY Varnishing Job

ಸೌP
From so many months I was wishing for new sofa covers. Finally I got them. 

Prior to dress with new cloths, all I wanted is to clean the sofas. I am allergic to dust. Therefor I always use dampen cloth for dusting. But for cleaning this Lantana furniture with cloth is very onerous, instead decided to wash!  Moved them to balcony and sprayed lot of water. After allowing them to dry, applied wood enamel+ varnish. Enjoyed painting varnish. It acted like a stress buster for me. It took a day to complete varnishing and here is the worthy shining sofa.

By next post I’ll show you before and after makeover.


February 18, 2012

Colorful Delight

ಸೌP


I wanted to have a nice painting for our living room. As you know, a lovely paintings costs too much, I decided to do my own paper collage. So, collected different color news paper pages, tore it and created my own palate. I started pasting on a newspaper as my mood said. Loved the process. Painted a coat of varnish to add shine. Its done. Actually I should have pasted this on a card sheet. As my base was a thin newspaper, collage got lot of wrinkles. Still its OK, what you say?


Here is the end result, looking good. Isn't it?

July 19, 2011

DIY Table Lamp

ಸೌP
From so many days, this project was pending. Finally. last Sunday I made some time to finish this. The result is pleasing. Yes, I'll change table decor soon. For now, this is looking good.


When I went to purchase wire n other stuff for this DIY, that shop owner was surprised!! Why he consider electrician work as 'man thing' !! I don't know. A lady can fix these things. Its so easy to make. No so called MAN is needed for this or for fixing tube light or changing bulbs or connecting wires for decorating lights, sigh.

Here are the simple steps which I followed. Take a look.

April 08, 2010

Paper mache masks

ಸೌP
Here is my paper mache decorative project. I followed "Poopscape Projects". But it was utterly a failure. Why? Yes, its because of "The great Rats". I did this work at night, and then stick both of these on my balcony garden wall. When I got up next morning, both were missing.  I found them on the floor without eyes and nose ! Rats have smelled ata/flour in them and feasted on them. Because of these rats, how can I give up my idea? So, now I am going to try with POP. Better work next time.


SIMPLE Steps: Soak paper cuttings overnight-Grind it-Drain the water-Mix flour and salt-Knead it well till u get desire consistency- Den make any shape out of this as you wish-Color them as u like-Dry them in shade-Hang/stick and Enjoy your craft with hot chai/tanda lemonade/what u love.

April 01, 2010

DIY Milk Paint

ಸೌP
I was amazed to learn about the milk paint concept through Marthastewart. Then I decided to try it out for myself. I reside in a rented apartment, and don't have permission to repaint the walls. So what to do? After much more deliberation, decided to try it on under beneath portion of the washing basin. And also it was looking very much dirty.

Here is the process I followed.

1. Chosen wall in its original condition.
2. Started with dampening the wall with wet cloth and used washing brush to remove the old paint.
3. Leveled the wall using a wood piece + applying my own mixture of lime n Fevicol
4. Mixed lime + milk solids in equal portion (no color added)
5. Painted using an old brush.(strokes are visible)

I have mixed the milk solids and lime in wrong proportion that paint became sticky. So next day, I went out and bought a new brush and color pigment bottle.

6. Tried with 4:1 proportion. 

Result was good as compared to the old one. Paint was not sticking to my fingers. 

It’s done! Now, I am satisfied with the result. The color is bit odd. Thought to repaint with the white color, may be some other day. 

This is my first wall painting experience. One can notice uneven brush strokes. Still, It is Ok for me. Next time better work .

If you are interested to know more about 'Milk Paint', visit The Earth Pigments. Here you will get step by step guide about how to prepare milk and lime paint. This site also gives you variety of information about wall paints.

March 24, 2010

Water Lilly replanting

ಸೌP
I had brought Lilly seed from my mamma’s home. I kept it in a little earthen uruli. After some days I changed it to a bigger pot and kept outside. Then the problem begins. Daily I used to feed pigeons. Those pigeons made that pot as a birdbath. They used to sit in water and play. And due to this all newborn leaves used to torn. I tried different methods to shove away the pigeons, but all went in vein .Then I decided to replant and allow pigeons to use that old pot to play.

I took an old, tattered bucket, and removed its upper portion using knife. Then folded news papers and pin around its edge. Later put soil (1/4thportion of the bucket) and placed Lilly seed on the soil surface. It should not be placed pressed inside the soil. After that, filled the bucket with water and started to wait for the leaves to emerge. Maybe after a week, leaves started to show up. And one fine morning, after a month from planting,  I was delighted to see a flower bud. Finally next morning flower started to bloom. It took 2-3days to fully bloom. Then it bend in water and died giving birth to new seeds. Now, I am eagerly waiting for another flower to emerge from water.
Here are the snaps of the process and the end result;

January 07, 2010

Hanging Earings Stand

ಸೌP
I have few  hanging earrings. I wanted to store them in a easily accessible pattern. After getting inspiration from some blog ( as i don't remember now), I had prepared my own earring stand using a wooden tile and rubber bands. These bands were tearing of due to the tension. Therefor, tried with thick black thread. This method worked out well. Here is the good result. How you guys store your pretty jewelries?

May 22, 2009

Bombay Times Hand Fan ;)

ಸೌP

I do this hand fan whenever there is power cut. Its very easy to make and take less than five minute. This also easily sits inside money purse/jeans packet after folding. Moreover to make this all you need is a paper and a stapler!

Don't forget to send me pictures of your hand fans :)

Have FUN!

(Tip: can be done from single color card sheet- attach peacock neck+head to the feather-can be more decorative with paper collage................)

May 06, 2009

Collage Wedding Invitation

ಸೌP
This is my personal wedding card. Actually,  I wanted to make something new kind of crafty card and ended up with this idea. I had made more than 30 handmade cards, each one carried images of different tourist spots near my native place. The envelope was made with newspaper too.  Now I have left with this single ready piece to remember my fetish.


February 18, 2009

X'mas gifting

ಸೌP
Meghana is a cute 5yr girl living upstairs. She daily comes to my house with lot of queries. I enjoy answering her and playing with her.  On X'mas, I wanted to surprise her. I made these, put them in a paper bag and hanged them outside their door. I knocked the door and quietly came down. Later her mom told me that Meghana was surprised to see the gift and thought gift is really from Santa!


Small Xmas tree done referring foldingtrees.com and paper box referring a craft book.

Coprights @ 2016, Blogger Templates Designed By Templateism | Distributed By Gooyaabi Templates